-
CentOS & RHEL 최소 설정
CentOS & RHEL 최소 설정
기본
PRE. 파티션 분리 및 기본 디렉토리 생성(/server, /web-source 또는 /app-source, /logs, -DB-/data)
계정생성 및 리눅스 환경 확인
- 한글확인 : locale (ko_KR.UTF-8)
- KST 확인 (ls /usr/share/zoneinfo/Asia/Seoul –> ln -sf /usr/share/zoneinfo/Asia/Seoul /etc/localtime)
- root 및 신규계정 패스워드 변경
- 번들로 설치된 httpd, mysql, svn 제거 (yum remove)
- Package 설치
yum install ntp gcc gc gcc-c++ make apr-util openssl openssl-devel zlib zlib-devel unzip perl- sudo 권한이 필요한 관리 계정인 경우: wheel 그룹에 계정 그룹(/etc/group)을 추가 후 다음을 실행 또는 직접 계정 추가 – 개발서버만 할 것
$ visudo ## Allows people in group wheel to run all commands (주석제거) %wheel ALL=(ALL) ALL- jdk 설치: /usr/local/java
alternative 설정 (Jenkins 서버에서 재기동을 위해 기본 Java 실행 위치를 지정해주어야 한다) $ alternatives --install /usr/bin/java java /usr/local/java/jdk1.7.0_67/bin/java 100 $ alternatives --config java (등록한 Java가 1번 으로 선택되어있어야 한다)- iptables disable : vhost web 서버일 경우는 on
hostname 재설정 (hostname, /etc/hosts, /etc/sysconfig/network) : 딱히 정해진 Rule은 없지만 대부분
“회사(Shortcut) + H(HTTPD)/W(WAS)/D(DB, Cache) + 시스템 + [글로벌일 경우 Region] + D(개발)/P(운영) + 일련번호”
- API Service WAS-개발: HSWAPISVCD01
- API Service DB-운영 : HSDAPISVCP01
logroatated 설정 (선택사항)
/etc/logrotate.conf
   # see "man logrotate" for details
   # rotate log files weekly
   daily
   # keep 14 days worth of backlogs
   rotate 14
NTP 설정 (/etc/ntp.conf)
# 자체 NTP 서버가 없을 경우
server 0.rhel.pool.ntp.org
server 1.rhel.pool.ntp.org
server 2.rhel.pool.ntp.org
설정 확인됬으면
$ ntpdate 0.rhel.pool.ntp.org
$ service ntpd start
$ chkconfig ntpd on
# 확인
$ ntpq -p
FTP 설정(no guest) 및 불필요 계정 삭제
# CentOS/RHEL 종류, 버전에 따라 차이 있음
userdel adm
userdel lp
userdel ftp
userdel sync
userdel shutdown
userdel halt
userdel news
userdel uucp
userdel operator
userdel games
userdel gopher
userdel apache
userdel oprofile
userdel nfsnobody

groupdel adm
groupdel lp
groupdel news
groupdel uucp
groupdel games
groupdel dip
groupdel pppusers
groupdel slipusers
Limit ‘su’ command (/etc/pam.d/su) 주석제거
#auth required pam_wheel.so use_uid$ chmod 4750 /bin/su(선택사항) root 계정 login 막을려면 /etc/ssh/sshd_config 파일의 ‘PermitRootLogin no’ 수정 후,
service sshd restart계정별 기본 설정
- .bashrc
###########################################################
# Bash Setting
###########################################################
set -o vi
alias ll='ls -alh'
alias vi=vim
alias grep='grep --color'
alias du='du -h --max-depth=1'
(root 계정 전용)
DEFAULT="\[\033[m\]"
BG_BLUE="\[\033[44m\]"
BG_RED="\[\033[41m\]"
PS1=$BG_RED"[\u@\h \W]"$DEFAULT" \\$ "
export PS1
profile 기본 설정 (/etc/profile)
###########################################################
# Profile Setting
###########################################################

export LC_ALL=ko_KR.UTF-8
export LANG=ko_KR.UTF-8

export LS_COLORS="di=01;31":"fi=01;37":"ex=01;32":"ln=01;36":"so=01;33"

# Add timestamp to .bash_history
export HISTTIMEFORMAT="%F %T "

# Add session timeout 1800
TMOUT=1800
HISTSIZE=10000
(JDK 설치 서버)
## JDK
export JAVA_HOME=/usr/local/java/jdk1.7.0_80
export PATH=$PATH:$JAVA_HOME/bin
export CLASSPATH=$JAVA_HOME/jre/lib:$JAVA_HOME/lib/tools.jar
(MariaDB 설치 서버)
## MariaDB
export MARIADB_HOME=/engn001/maria/mariadb-10.0.21
export PATH=$PATH:$MARIADB_HOME/bin
ulimit 환경 수정 (/etc/security/limits.conf)
작업전에 아래의 설정 존재여부 확인 후, 없으면 추가 /etc/pam.d/login
session required pam_limits.so/etc/pam.d/sshd
session required pam_limits.so/etc/security/limits.conf
*               soft    nofile          65536
*               hard    nofile          65536
*               soft    stack           20480
*               hard    stack           20480
### 여기서 일반
*               soft    nproc           65536
*               hard    nproc           65536
### Apache
# max user processes for apache (pending signals에 맞추면 좋다)
*               soft    nproc           158757
*               hard    nproc           158757
System 커널 수정 (/etc/sysctl.conf –> sysctl -p)
--- 일반 미들웨서 서버
##### max file count #####
fs.file-max = 65535

--- DB서버
##### max file count #####
fs.file-max = 6815744

### Disable IPv6 ###
net.ipv6.conf.all.disable_ipv6 = 1
net.ipv6.conf.default.disable_ipv6 = 1
net.ipv6.conf.lo.disable_ipv6 = 1

--- Front End 계열 서버 설정
### MAX Connection ###
net.core.somaxconn = 4096 ~ 65535

--- 일반 미들웨서 서버
### MAX Connection ###
net.core.somaxconn = 2048

--- DB서버
### MARIA setting ### : 안해도 됨
net.core.rmem_default = 8388608
net.core.wmem_default = 8388608
net.core.rmem_max = 8388608
net.core.wmem_max = 8388608
net.ipv4.tcp_syn_retries = 2
net.ipv4.tcp_retries2 = 5
net.ipv4.tcp_rmem = 8388608 8388608 8388608
net.ipv4.tcp_wmem = 8388608 8388608 8388608
net.ipv4.tcp_rfc1337 = 1
net.ipv4.tcp_max_syn_backlog = 8192
net.ipv4.tcp_keepalive_time = 600
net.ipv4.tcp_fin_timeout = 30
net.ipv4.ip_local_port_range = 1024 65535
net.ipv4.tcp_max_tw_buckets = 2000000

### REDIS Support ###
vm.overcommit_memory = 2
vm.overcommit_ratio = 99
vm.swappiness = 0
기타
/etc/rc.d
### for REDIS ### echo never > /sys/kernel/mm/transparent_hugepage/enabled -
MongoDB HA 구성 조언 기록
MongoDB HA 구성 관련해서 들은 고수의 조언을 녹음한 내용을 기록함. 다는 잘 모르겠지만 나중을 위해 일단 기록해두고 공부ㅠ…
참고 이미지

출처: [kthdaisy.com] 포스퀘어가 MongoDB를 선택한 이유 : Auto-Sharding
-
mongos서버는 Cache기반으로 데이터 정보를 유지하고, config 서버는 메타 정보를 유지하는 역할을 한다.
- mongod서버는 특정크기 만큼 데이터를 Chunk하는 작업을 수행한다. 이과정을 Split 이라고 하며, 이과정은 Document 사이즈가 늘어나면 자연히 발생하며 Disable 할수 없다.
- Chunk된 조각을 다른 Cluster에 넘기는 과정을 Migration이라고 한다.
- Chunk는 File Base로 일어난다.
- 데이터 용량이나 사용자 측면에서 소규모라면 그냥 mongod 서버만 쓰고 ‘Replica Sets’만으로만 구성 하는것도 상황에 따라서는 선택할 수 있다.
- ‘spring-data-mongo’에서 Master-Slave 설정이 가능함.
-
Sharding 구성을 하지 않는다면 ‘spring-data-mongo’의 ‘master’ 옵션 R/W속성 조합을 통해서 Failover 수행이 가능함.
- Sharding을 하는 경우 Sharding Key가 Chunk수행의 단위가 된다. 따라서 키 값의 선택이 중요하므로 응용 프로그램에서 Collection 데이터 키 중 가정 기준 값이라고 할 수 있는 unique 속성을 가지는 값으로 설정해야 한다. 따라서 ‘_id’ 값을 선택하던지 커스텀 유니크 값을 생성하는게 좋다.
- 커스텀 할 경우 가급적 특정 컬럼의 데이터의 hashing 값을 Sharding Key로 잡는다.
- Hashing이 중요한 이유는 데이터 탐색이 더 잘되도록 Chunk 데이터가 잘 분배되게 해야하기 때문이다.
- Collection마다 Hashing 기준을 다르게 할 수 있다.
- 이러한 구성의 장점 중 하나는 Slave 데이터가 깨져도 복원-초기화가 가능하다는 것이다.
- 단일 서버 구성이면 Chunk 과정이 없다. 따라서 데이터가 늘어나면 탐색속도가 많이 느려진다.
기타 잡지식
- MongoDB의 ‘Query-Timeout’은 Query 실행 옵션에 넣는다.
- majority사용은 주의해서 써야하며 ‘1’이상 설정은 성능저하를 유발하기 때문에 지양하는 것이 좋다.
-
-
Spring Data Redis(spring-data-redis)를 활용한 간단 개발
Spring Data Redis를 활용하여 간단한 Redis 연계 방법을 기록한다.
- 환경은 Spring Framework 4.2.x 이상
- Maven Project 환경을 가정한다.
- pom.xml의 dependency에 라이브러리 의존 추가
<!-- Spring Data Redis : Server Type -->
<dependency>
	<groupId>redis.clients</groupId>
	<artifactId>jedis</artifactId>
	<version>2.7.3</version>
</dependency>
<dependency>
    <groupId>org.springframework.data</groupId>
    <artifactId>spring-data-redis</artifactId>
    <version>1.7.5.RELEASE</version>
</dependency>
라이브러리 버전은 순전히 예시이며 실제 구성시 Redis 버전 및 Spring Framework 버전의 의존을 명확히 확인하여 적용한다.
만약에 당장 Redis 서버를 구성하기는 어렵고 당장 테스트한번 해보고 싶다면 좀 오래되었기는 했지만 Embedded Redis서버 라이브러리 의존을 추가하여 Java 코드를 통해 Redis 서버를 로컬에서 실행해볼 수 있다.
<dependency>
	<groupId>com.github.kstyrc</groupId>
	<artifactId>embedded-redis</artifactId>
	<version>0.6</version>
</dependency>
Embedded Redis 라이브러리는 많이 오래된 Redis 서버를 내장하고 있다. 상용목적으로 사용하기에는 무리가 있다.
- Spring Context 설정(XML)
- Spring Context 설정 경로에 ‘context-cache-redis.xml’ 파일을 만들어서 아래와 같이 작성해본다.
각 속성에 대한 설명은 주석 참조 (어디까지나 ‘간단 개발’을 위한 예시이다)
<?xml version="1.0" encoding="UTF-8"?> <beans xmlns="http://www.springframework.org/schema/beans" xmlns:xsi="http://www.w3.org/2001/XMLSchema-instance" xmlns:context="http://www.springframework.org/schema/context" xmlns:c="http://www.springframework.org/schema/c" xmlns:p="http://www.springframework.org/schema/p" xmlns:cache="http://www.springframework.org/schema/cache" xmlns:util="http://www.springframework.org/schema/util" xsi:schemaLocation="http://www.springframework.org/schema/beans http://www.springframework.org/schema/beans/spring-beans.xsd http://www.springframework.org/schema/context http://www.springframework.org/schema/context/spring-context.xsd http://www.springframework.org/schema/cache http://www.springframework.org/schema/cache/spring-cache.xsd http://www.springframework.org/schema/util http://www.springframework.org/schema/util/spring-util.xsd"> <!--======================================================================= = Spring Data Redis (Jedis Wrapper) 설정 ==========================================================================--> <!-- Redis Client --> <bean id="jedisConnFactory" class="org.springframework.data.redis.connection.jedis.JedisConnectionFactory"> <property name="hostName" value="127.0.0.1" /> <!-- Redis IP --> <property name="port" value="6379" /> <!-- Redis Port --> <!-- <property name="password" value="guest" /> 패스워드가 있을 경우 주석 해제 및 설정 --> <property name="timeout" value="5000" /> <!-- Connection Timeout --> <property name="usePool" value="true" /> <!-- Connection Pool 사용 여부 --> <property name="poolConfig"> <bean class="redis.clients.jedis.JedisPoolConfig"> <property name="maxTotal" value="5" /> <!-- 최대 Connection Pool 사이즈 --> <property name="maxWaitMillis" value="10000" /> <!-- Connection Pool 최대 대기 시간 --> </bean> </property> </bean> <!-- 만약에 Sentinel을 이용한 이중화 구성을 시도할 경우 아래 설정을 참고하자 (두 대의 Sentinel 예시) <bean id="jedisConnFactory" class="org.springframework.data.redis.connection.jedis.JedisConnectionFactory"> <constructor-arg name="sentinelConfig"> <bean class="org.springframework.data.redis.connection.RedisSentinelConfiguration"> <property name="master"> <bean class="org.springframework.data.redis.connection.RedisNode"> <property name="name" value="실제 서버의 마스터 노드의 이름" /> </bean> </property> <property name="sentinels"> <set> <bean class="org.springframework.data.redis.connection.RedisNode"> <constructor-arg name="host" value="Sentinel 1번 Host" /> <constructor-arg name="port" value="Sentinel 1번 포트" /> </bean> <bean class="org.springframework.data.redis.connection.RedisNode"> <constructor-arg name="host" value="Sentinel 2번 Host" /> <constructor-arg name="port" value="Sentinel 2번 포트" /> </bean> </set> </property> </bean> </constructor-arg> <property name="password" value="패스워드-없으면 주석처리" /> <property name="timeout" value="5000" /> <property name="usePool" value="true" /> <property name="poolConfig"> <bean class="redis.clients.jedis.JedisPoolConfig"> <property name="maxTotal" value="최대 Connection Pool 사이즈" /> <property name="maxWaitMillis" value="10000" /> </bean> </property> </bean>--> <!-- JSON Redis template definition: Jackson2를 이용한 JSON 데이터 저장 Template (POJO 또는 Map 객체를 JSON 형태로 Redis에 저장할 수 있다) --> <bean id="jsonRedisTemplate" class="org.springframework.data.redis.core.RedisTemplate"> <property name="connectionFactory" ref="jedisConnFactory" /> <property name="enableTransactionSupport" value="false" /> <property name="keySerializer"> <bean class="org.springframework.data.redis.serializer.StringRedisSerializer" /> </property> <property name="valueSerializer"> <bean class="org.springframework.data.redis.serializer.GenericJackson2JsonRedisSerializer" /> </property> <property name="hashKeySerializer"> <bean class="org.springframework.data.redis.serializer.StringRedisSerializer" /> </property> <property name="hashValueSerializer"> <!-- 예전 버전은 POJO 타입 고정 이었지만(즉, 타입별로 Template 생성ㄷㄷ) 이제는 타입 자체를 Cache에 같이 저장한다 --> <bean class="org.springframework.data.redis.serializer.GenericJackson2JsonRedisSerializer" /> </property> </bean> <!-- Default Redis template definition: 예제 전용 (Redis에 객체를 직렬화하여 저장) --> <bean id="defaultRedisTemplate" class="org.springframework.data.redis.core.RedisTemplate"> <property name="connectionFactory" ref="jedisConnFactory" /> <property name="enableTransactionSupport" value="false" /> <property name="keySerializer"> <bean class="org.springframework.data.redis.serializer.StringRedisSerializer" /> </property> <property name="valueSerializer"> <bean class="org.springframework.data.redis.serializer.JdkSerializationRedisSerializer" /> </property> <property name="hashKeySerializer"> <bean class="org.springframework.data.redis.serializer.StringRedisSerializer" /> </property> <property name="hashValueSerializer"> <bean class="org.springframework.data.redis.serializer.JdkSerializationRedisSerializer" /> </property> </bean> <!-- Redis Cache Manager를 이용한 개별 Cache 관리 및 @Cache Annotation 연동 예시 --> <bean id="redisCacheManager" class="org.springframework.data.redis.cache.RedisCacheManager"> <constructor-arg ref="jsonRedisTemplate" /> <property name="cacheNames"> <list value-type="java.lang.String"> <description>@Cache Annotation과 연계하려는 Cache를 아래에 등록한다 (자동생성)</description> <value>examlpleCache</value> </list> </property> <property name="expires"> <map> <description>위에 등록한 Cache이름 별로 Cache Expire Timeout을 설정해야 한다 (단위: 초)</description> <entry key="examlpleCache" value="60" /> </map> </property> </bean> <!--====================================================================== = Redis Cache 설정 =========================================================================--> <!-- 응용에서 사용하는 Cache Bean은 아래에 정의한다 ('redisOperations' 속성은 객체 및 데이터 특성에 따라 설정한다: 객체를 JSON 형태로 Cache에 저장하는 경우 'jsonRedisTemplate' 설정) --> <!-- Sample Cache Bean --> <bean id="redisSampleCache" class="org.springframework.data.redis.cache.RedisCache"> <!-- Cache Name --> <constructor-arg name="name" value="sampleCache" /> <!-- Prefix: 반드시 Cache Name + ":" 으로 설정 --> <constructor-arg name="prefix" value="sampleCache:" /> <!-- Rest Template 참조 --> <constructor-arg name="redisOperations"><ref bean="defaultRedisTemplate" /></constructor-arg> <!-- Cache 만료 시간: 초 --> <constructor-arg name="expiration" value="60" /> </bean> </beans>- RedisCache.prefix 속성: Redis에 저장되는 Cache 데이터들의 Key 중복 위험을 막기 위해 Cache Key앞에 붙이는 Group 구분자. 포스트 작성자는 Cache name + “:” 값으로 설정할 것을 권장한다.
- 단일 Redis Database에서 여러 캐시를 상호 구분하여 사용해야 하는 경우 데이터 관리하기 용이하다.
- Redis 연계 서비스 클래스를 만드는 예시는 아래와 같다.
포스트 작성자는 간단한 개발에는 Spring Cache(org.springframework.cache.Cache == RedisCache) 추상 타입을 더 선호한다…
주석을 꼭 읽어봅시다
# CacheServiceImpl.java /** * <PRE> * CacheService(Redis) 구현 클래스 * </PRE> * * @author 윤순혁 * @version 1.0 * @see CacheService */ @Service( "redisCacheService" ) public class CacheServiceImpl implements CacheService { private static final Logger LOGGER = LoggerFactory.getLogger( CacheServiceImpl.class ); /** * Redis Cache(sampleCache) Resource (Spring Cache 기본 인터페이스: 일반적인 업무기능 개발편의를 제공) * 주의: RedisCache는 ValueOperation으로 동작한다. */ @Resource( name = "redisSampleCache" ) private Cache cache; /** * Redis Template Resource (Redis 연동과 관련된 직접적인 기능을 활용 가능) */ @Resource( name = "defaultRedisTemplate" ) private RedisTemplate<String, Object> redisTemplate; /** * Cache 초기화 */ @PostConstruct public void initializeCache() { try { // TODO 이곳에 Sample Cache 초기화 데이터를 추가하면 된다. putData( "키 입니다", "값 입니다" ); } catch ( Exception ex ) { LOGGER.error( "[Sample Cache] Cache Initialize Error", ex ); } } /* (non-Javadoc) * @see com.lgcns.msp.guide.cache.service.CacheService#putData(java.lang.String, java.lang.Object) */ @Override public <T> void putData( String key, T value ) { // Spring Cache를 활용한 Redis 연동 예시 cache.put( key, value ); // Redis Template을 활용한 Value Operation 수행 예시 /* * (필독) * Redis Cache Key를 ':' 문자열을 붙인 패턴으로 저장하는 이유 * Redis Key를 구분자 및 인덱스로 활용 가능하기 때문에 * 만약 단일 Redis Database에서 여러 캐시를 상호 구분하여 사용해야 하는 경우 데이터 관리하기 용이하다. * (참조: https://redislabs.com/blog/5-key-takeaways-for-developing-with-redis#.WDeob7KLQ1s) * PS. * 데이터 타입을 'Hash'로 하여 서로 다른 Cache를 키로 구분하고 데이터관리를 Map 형태로 처리하는 방법도 있다 * (단, 데이터가 급증 할 경우 Index Time 증가한다) */ redisTemplate.boundValueOps( Joiner.on( ':' ).join( cache.getName(), key ) ).set( value, 60, TimeUnit.SECONDS ); } /* (non-Javadoc) * @see com.lgcns.msp.guide.cache.service.CacheService#getData(java.lang.String, java.lang.Class) */ @Override public <T> T getData( String key, Class<T> paramClass ) { // Cache에서 Data를 가져온다 return cache.get( key, paramClass ); } /* (non-Javadoc) * @see com.lgcns.msp.guide.cache.service.CacheService#removeData(java.lang.String) */ @Override public void removeData( String key ) { // Spring Cache를 활용한 Redis 연동 예시 cache.evict( key ); // Redis Template을 활용한 Value Operation 수행 예시 redisTemplate.delete( Joiner.on( ':' ).join( cache.getName(), key ) ); } }-
테스트는 Controller 개발 또는 Mock 등을 통해 수행한다.
-
기타: 테스트를 위한 로컬에서 Embedded Redis 실행
-
‘1번’ 과정에서 Embedded Redis 라이브러리 의존을 추가했다면 아래와 같이 Java를 개발하여 실행 가능하다.
-
주의: Embedded Redis 라이브러리 원리는 linux/windows redis 파일을 내장하고 있다가 임시 경로에 복사하고 실행하는 Java Process Wrapper이다. 따라서 Java 프로그램만 Kill할 경우 Redis 프로세스는 수동으로 Kill 해야한다. 그러니 Redis 정지도 함수 호출을 통해 정지한다.*
# EmbeddedRedisServer.java /** * <PRE> * Simple Embedded Redis Server * 주의1: 로컬 테스트 목적 이외에는 사용 금지 (프로젝트 서버 목적으로 사용할 수 없음) * 주의2: 반드시 명령어 입력을 통해서 프로그램을 종료해야 합니다. * </PRE> * * @author 윤순혁 * @version 1.0 */ public class EmbeddedRedisServer { private static final int REDIS_PORT = 6379; public static void main( String[] args ) { try (Jedis jedis = new Jedis( "127.0.0.1", REDIS_PORT ); Scanner input = new Scanner( System.in )){ RedisServer redisServer = RedisServer.builder() .port( REDIS_PORT ) .setting( "daemonize no" ) .setting( "appendonly no" ) .build(); redisServer.start(); System.out.println( "\nEmbedded Redis Server Started" ); System.out.println( "==============================================================================" ); System.out.println( "주의사항: 반드시 명령어 입력을 통해서 프로그램을 종료해야 합니다." ); System.out.println( " (그렇지 않으면 Redis 데몬을 '작업관리자'에서 프로세스 종료 시켜야 함)" ); System.out.println( "==============================================================================" ); System.out.println( "기능 (콘솔 창에 명령어 입력 후 Enter)" ); System.out.println( "Redis 상태보기: status" ); System.out.println( "Redis 종료: stop" ); System.out.println( "==============================================================================" ); String inputLine = ""; jedis.connect(); while ( !inputLine.equals( "stop" ) ) { System.out.print( "[기능 입력] # " ); inputLine = input.nextLine(); switch ( inputLine ) { case "stop": redisServer.stop(); System.out.println( "\nEmbedded Redis Server Stopped" ); break; case "status": System.out.println( jedis.info() ); break; default: break; } } System.exit( 0 ); } catch ( Exception redisError ) { System.err.println( "Embedded Redis Server error: " + redisError.getMessage() ); } } } -
RabbitMQ 설치 및 구성
RabbitMQ란?
- RabbitMQ는 간단하게 말하면 AMQP (Advanced Message Queueing Protocol) 기반의 오픈 소스 메시지 브로커 소프트웨어(Message broker)이다.
- Message Broker는 프로세스 또는 서버간 데이터(메시지) 전달을 약속된 프로토콜에 따라 효율적으로 송/수신 하기 위해 저장 및 전달을 수행하는 연결자(서버)를 말한다.
- 저장은 전송 과정에 있어 메시지 유실을 방지하고 한정된 전송 대역을 유지하는 방법의 제공이고 전달은 동기/비동기, Text/Stream, Failover, Retry 등 정확하고 효과적인 메시지 전달 방법에 대한 기술 제공을 의미한다.
- 위와 같이 서로 다른 시스템간 비용/기술/시간적인 측면에서 최대한 효율적인 방법으로 메시지를 교환하기 위한 MQ 프로토콜 중 RabbitMQ가 주력으로 사용하는 프로토콜은 AMQP(Advanced Message Queing Protocol)이다.
- Message Broker가 가지고 있는 비동기/분산/다중 프로토콜 메시징 기능은 모바일 서버 생태계의 데이터 Push/UX 상호작용/데이터 수집 채널 등 다양한 요건을 만족할 수 있다.
RabbitMQ 특/장점
- 표준 AMQP (Advanced Message Queueing Protocol) 메세지 브로커 소프트웨어(message broker software)
- 메시지 중계(Topic) 및 Queueing(Queue) 모두 지원: 즉, Pub/Sub과 Produce/Consume 모두 쉽게 설계 가능
- Java Integration 개발 지원(Spring Integration AMQP, Spring Rabbit)
- 관리 Web 페이지를 제공하여 내부 자원(Queue, Topic) 설정 및 모니터링 가능
- 주요 운영체제에서 모두 실행 가능
- 오픈 소스 제공 뿐만 아니라 상용 및 사후 지원 제품(Pivotal RabbitMQ)을 제공
- HA(Highly Available) 구성이 편하다.
설치 사전 과정
아래의 설치과정은 Redhat 계열 리눅스 대상 설치를 전제함
Erlang(OTP) 설치
- OS 기본 설정은 이곳에 작성된 ‘CentOS & RHEL 최소 설정’ 글을 참고하고 여기 추가적인 컴파일 라이브러리 설치
yum install glibc glibc-devel make ncurses-devel autoconf libssl-dev-
작성자는 yum으로 erlang 설치를 좋아하지 않으므로 http://www.erlang.org/ 에서 OTP(Java로 따지면 JDK)를 다운받는다.
- 단, http://www.rabbitmq.com/which-erlang.html 페이지를 꼭 참고해서 적당한 버전을 다운로드 해야한다.
- 자신없으면 가장 최근 안정화(Stable) 버전
-
다운로드 및 컴파일
[root] mkdir -p /usr/local/erlang_inst && cd /usr/local/erlang_inst
[root] wget http://erlang.org/download/otp_src_18.3.tar.gz
[root] tar -zxvf otp_src_18.3.tar.gz
[root] cd otp_src_18.3
[root] ./configure
[root] make && make install
# 컴파일 로그 잘 확인한 다음 설치 확인
[root] erl
/etc/profile 설정
[root] vi /etc/profile
## erlang 추가
export ERL_HOME=/usr/local/lib/erlang
export PATH=$PATH:$ERL_HOME/bin
(저장 후 적용)
[root] source /etc/profile
RabbitMQ 설치
다운로드 및 압축해제
[rabbitmq] mkdir -p /engn001/rabbitmq/ && cd /engn001/rabbitmq
[rabbitmq] wget http://www.rabbitmq.com/releases/rabbitmq-server/v3.6.5/rabbitmq-server-generic-unix-3.6.5.tar.xz
[rabbitmq] tar -xvf rabbitmq-server-generic-unix-3.6.5.tar.xz
[rabbitmq] chown rabbitmq.rabbitmq rabbitmq_server-3.6.5
[rabbitmq] cd rabbitmq_server-3.6.5
환경설정
간단한 환경설정 예시
- ~/sbin/rabbitmq-defaults
vi /engn001/rabbitmq/rabbitmq_server-3.6.5/sbin/rabbitmq-defaults # 아래의 부분을 편집하고 저장 ### next line potentially updated in package install steps ## RABBIT_HOME 재정의 RABBITMQ_HOME=/engn001/rabbitmq/rabbitmq_server-3.6.5 SYS_PREFIX=${RABBITMQ_HOME} ### next line will be updated when generating a standalone release ERL_DIR= CLEAN_BOOT_FILE=start_clean SASL_BOOT_FILE=start_sasl if [ -f "${RABBITMQ_HOME}/erlang.mk" ]; then # RabbitMQ is executed from its source directory. The plugins # directory and ERL_LIBS are tuned based on this. RABBITMQ_DEV_ENV=1 fi ## Set default values BOOT_MODULE="rabbit" CONFIG_FILE=${SYS_PREFIX}/etc/rabbitmq/rabbitmq ## 상용 레벨에서는 로그와 DB 경로는 별도의 파티션으로 관리되는 것이 좋다## LOG_BASE=${SYS_PREFIX}/var/log/rabbitmq MNESIA_BASE=${SYS_PREFIX}/var/lib/rabbitmq/mnesia ENABLED_PLUGINS_FILE=${SYS_PREFIX}/etc/rabbitmq/enabled_plugins PLUGINS_DIR="${RABBITMQ_HOME}/plugins" CONF_ENV_FILE=${SYS_PREFIX}/etc/rabbitmq/rabbitmq-env.conf ## Thread Pool 설정 (기본값) IO_THREAD_POOL_SIZE=64 ## Node 이름 (반드시 '@' 뒤에는 Hostname) NODENAME=node1@MY_HOSTNAME- ~/etc/rabbitmq/enabled_plugins
vi /engn001/rabbitmq/rabbitmq_server-3.6.5/etc/rabbitmq/enabled_plugins # 아래와 같이 편집하고 저장 [rabbitmq_management,rabbitmq_management_agent,rabbitmq_management_visualiser].- ~/etc/rabbitmq/rabbitmq.config
cd ./etc/rabbitmq/ wget --no-check-certificate https://raw.githubusercontent.com/rabbitmq/rabbitmq-server/stable/docs/rabbitmq.config.example cp rabbitmq.config.example rabbitmq.config vi rabbitmq.config # 아래와 같은 부분을 편집하고 저장 (편집시 ',' 문자에 주의한다. 마지막 속성 끝에 ','이 붙지 않도록 주의) %% To listen on a specific interface, provide a tuple of {IpAddress, Port}. %% For example, to listen only on localhost for both IPv4 and IPv6: %% %% {tcp_listeners, [{"127.0.0.1", 5672}, %% {"::1", 5672}]}, %% Listen {tcp_listeners, [{"0.0.0.0", 5672}]}, (중간 생략) %% Log levels (currently just used for connection logging). %% One of 'debug', 'info', 'warning', 'error' or 'none', in decreasing %% order of verbosity. Defaults to 'info'. %% %% {log_levels, [{connection, info}, {channel, info}]}, %% 로그 레벨 설정 {log_levels, [{connection, warning}, {channel, warning}]}, (중간 생략) %% Set the max permissible number of channels per connection. %% 0 means "no limit". %% %% {channel_max, 128}, %% 최대 Connection Channel 값 {channel_max, 128}, (중간 생략) %% Customising Socket Options. %% %% See (http://www.erlang.org/doc/man/inet.html#setopts-2) for %% further documentation. %% %% {tcp_listen_options, [{backlog, 128}, %% {nodelay, true}, %% {exit_on_close, false}]}, %% TCP Socket 기본 설정 {tcp_listen_options, [{backlog, 1024}, {nodelay, true}]}, (중간생략) %% Alternatively, we can set a limit (in bytes) of RAM used by the node. %% %% {vm_memory_high_watermark, {absolute, 1073741824}}, %% %% Or you can set absolute value using memory units. %% %% {vm_memory_high_watermark, {absolute, "1024M"}}, %% %% Supported units suffixes: %% %% k, kiB: kibibytes (2^10 bytes) %% M, MiB: mebibytes (2^20) %% G, GiB: gibibytes (2^30) %% kB: kilobytes (10^3) %% MB: megabytes (10^6) %% GB: gigabytes (10^9) %% Erlang VM 메모리 사용 한계 설정 (설치 서버 상황에 따라 다르게 설정 필요) {vm_memory_high_watermark, {absolute, "1024M"}}, (중간생략) %% Set disk free limit (in bytes). Once free disk space reaches this %% lower bound, a disk alarm will be set - see the documentation %% listed above for more details. %% %% {disk_free_limit, 50000000}, %% %% Or you can set it using memory units (same as in vm_memory_high_watermark) %% {disk_free_limit, "50MB"}, %% {disk_free_limit, "50000kB"}, %% {disk_free_limit, "2GB"}, %% Disk 작성되는 내장 DB 사이즈 {disk_free_limit, "2GB"}- iptables
vi /etc/sysconfig/iptables
(iptables 를 사용하고 있다면 아래의 설정 추가)

# RabbitMQ
-A INPUT -m state --state NEW -m tcp -p tcp --dport 5672 -j ACCEPT
-A INPUT -m state --state NEW -m tcp -p tcp --dport 15672 -j ACCEPT

[root] service iptables restart
실행
기동/중단
cd /engn001/rabbitmq/rabbitmq_server-3.6.5/sbin
(Daemon 프로세스 실행)
./rabbitmq-server -detached

(서버 프로세스 중단)
./rabbitmqctl stop [pid_file]

(환경 재구성을 위한 RabbitMQ Application 기동/중단)
./rabbitmqctl start_app
./rabbitmqctl stop_app
상태 확인
- Status
(/engn001/rabbitmq/rabbitmq_server-3.6.5/sbin) ./rabbitmqctl status- 로그
- $RABBIT_HOME/var/log/rabbitmq/node1@MY_HOSTNAME.log
Management Console
RabbitMQ의 Queue 구성 및 모니터링의 편의를 위한 구성
Management Console 계정 추가
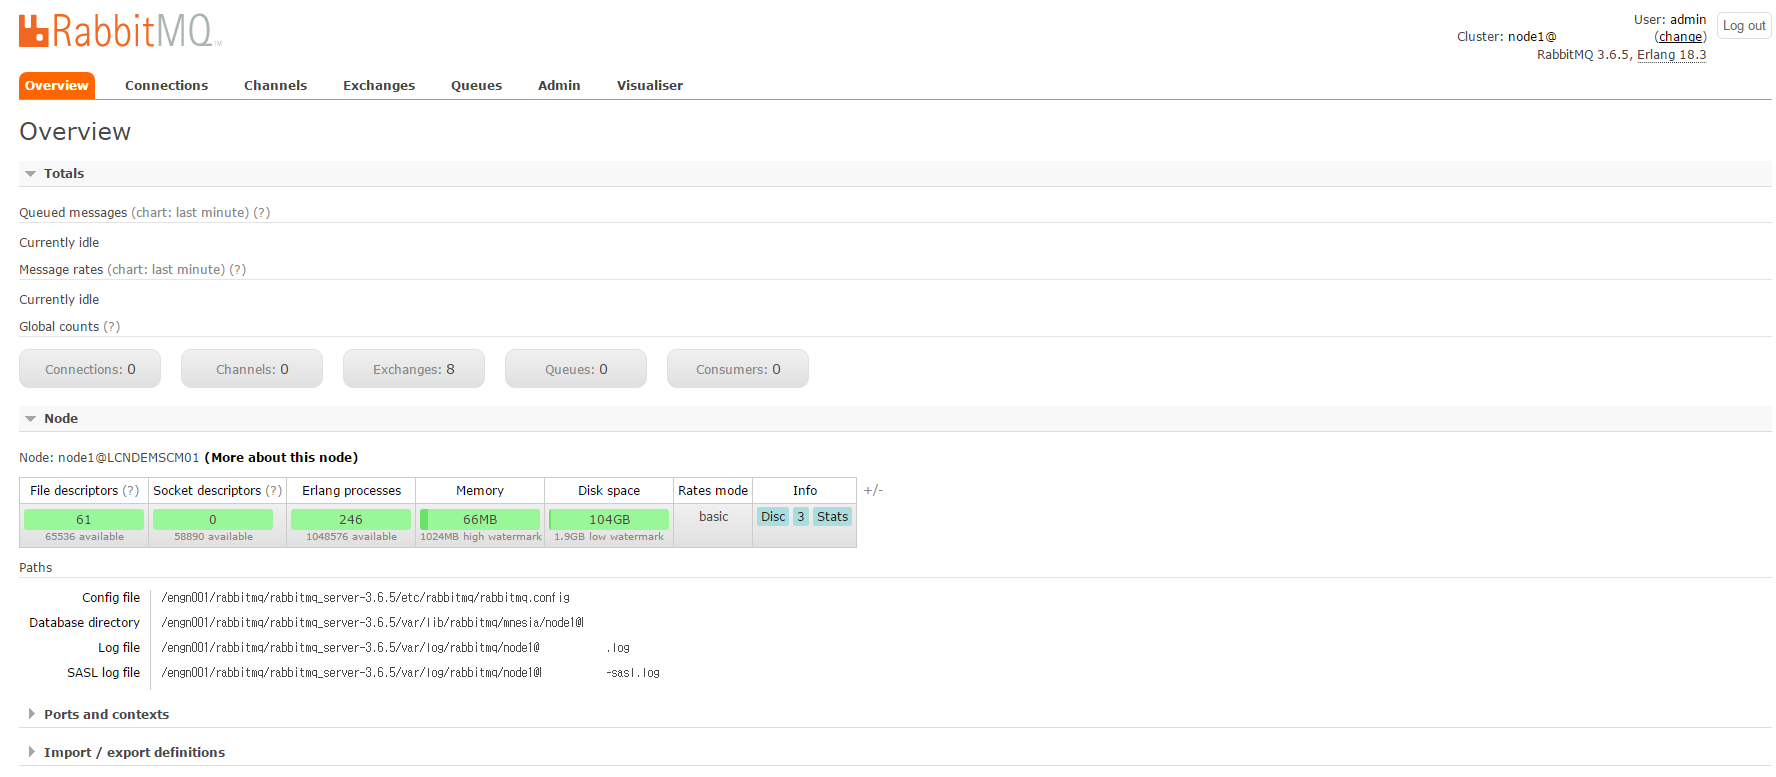
(/engn001/rabbitmq/rabbitmq_server-3.6.5/sbin)
./rabbitmqctl add_user admin 패스워드
./rabbitmqctl set_user_tags admin administrator
브라우저에서 서버IP:15672 로 접속한 다음 로그인 해본다.
- 등록한 ‘admin’ 계정으로 로그인 수행 후, 메인 콘솔 페이지를 확인할 수 있다.
-
IoT 서비스를 위한 MQTT Message Broker
MQTT란?
-
MQ TELEMETRY TRANSPORT
-
텔레메트리 장치, 모바일 기기에 최적화된 라이트 메시징 프로토콜
-
제한된 통신 환경을 고려하여 디자인되었으며 Embedded Device to Server간 최적의 프로토콜로 주목받고 있다.
-
프로토콜이 차지하는 모든 면의 리소스 점유를 최소화한다.
-
결국 베터리 문제이며 데이터 전송에 있어 사용되는 자원 소모를 최소화 하되 있을 건 다 있는 메시징 프로토콜
-
느리고 품질이 낮은 네트워크의 장애와 단절에 대비하고 IoT 디바이스는 애플리케이션 동작에 자원 활용이 극히 제한적임을 고려한다.
-
다수의 클라이언트 연결은 Publish/Subscribe 기반 메시징 제공
-
신뢰성 있는 메시징을 위한 QoS(Quality of Service) 옵션을 제공한다.
-
서버는 어떻게 구성하나?
-
본인이 직접 아키텍처 설계를 수행한 모 통신사 OneM2M IoT 플랫폼은 아래와 같은 고려가 필요했다.
-
QoS 2 까지 요청/응답 지원
-
외부 HTTP(REST) 연동을 통해 동적으로 사용자 인증
-
클러스터 구성 또는 불가할 경우 Bridge 지원
-
SSL 통신 지원을 통한 보안 준수
-
REST 방식의 관리자 API가 있을 경우면 좋지만 없을 경우 System Topic($SYS)을 통해 서버의 상태 및 클라이언트 접속에 대한 현황을 확인할 수 있어야 한다.
-
MQTT Broker를 골라보자
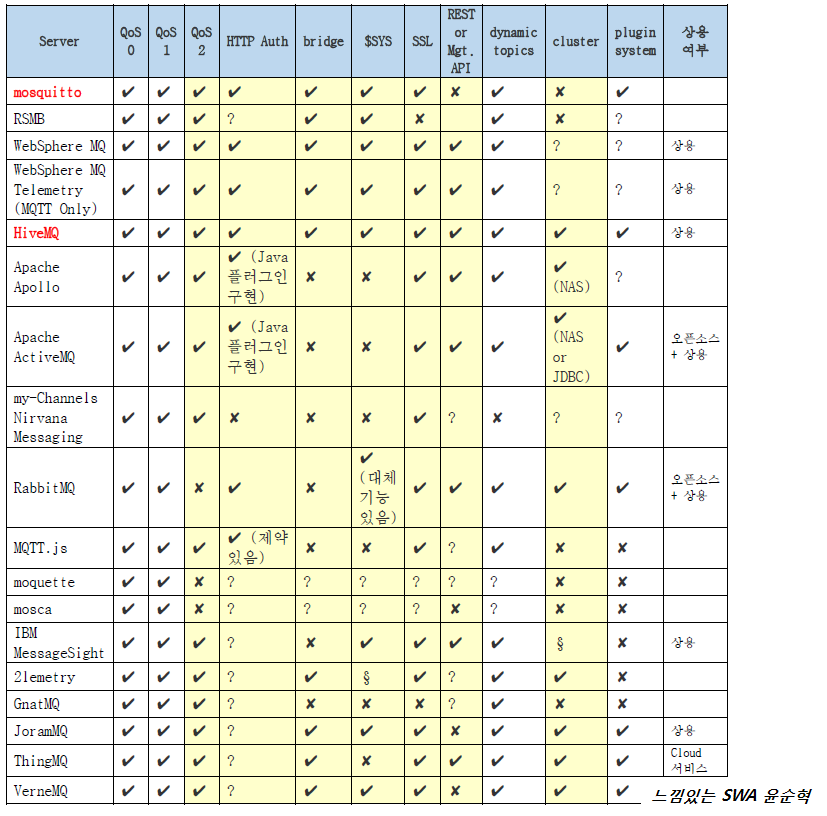
-